Water damage on a popcorn ceiling is not just an eyesore—it can lead to more significant problems like mold growth, weakened drywall, and costly repairs if left unchecked. Whether it is a small stain or significant sagging, dealing with it sooner rather than later can save you a lot of trouble down the road. But here is the challenge: popcorn ceilings are not the easiest to repair. Their textured surface makes blending repairs tricky, and in some cases, popcorn ceiling removal might be necessary if the damage is severe.
Do not worry if you are staring at water stains, peeling texture, or crumbling patches; you are not alone. Many homeowners face the same issue, and the good news is that with the right approach, you can restore your ceiling without making it look like a patchwork mess. This guide will walk you through everything you need to know about fixing popcorn ceiling water damage. From identifying the cause to seamless repairs and prevention tips, we will help you tackle the problem like a pro. Let’s get started!
How Water Damage Affects Popcorn Ceilings
Water damage can wreak havoc on popcorn ceilings, causing visible stains, peeling texture, and even structural issues. Because popcorn ceilings are made of a textured material that absorbs moisture easily, water exposure can lead to unsightly brown stains, weakened drywall, and crumbling sections. If left untreated, the damage can spread, making repairs more difficult and costly.
Beyond cosmetic issues, water damage can also create the perfect environment for mold and mildew growth. The porous nature of popcorn ceilings traps moisture, allowing mold to thrive—especially in humid areas like bathrooms or kitchens. This not only affects your ceiling’s appearance but can also pose health risks over time, leading to the need for popcorn ceiling removal.
In severe cases, prolonged water exposure can cause the ceiling to sag or collapse, which can be annoying, financial devastating, and unhealthy if there’s popcorn ceiling asbestos in the home. Repairs may not be enough if the damage is widespread, and popcorn ceiling removal might be the best option. Understanding these risks is crucial for taking quick action and preventing further deterioration. The sooner you address water damage and seek water restoration assistance, the easier it will be to restore your ceiling and avoid major headaches down the line.
Signs of Water-Damaged Popcorn Ceiling
Water damage on a popcorn ceiling isn’t always immediately apparent. While some signs, like stains or peeling, are easy to spot, others—such as a musty odor or soft texture—may take longer to notice.
Below are the most common indicators of water damage on a popcorn ceiling. If you notice any of these signs, addressing the underlying moisture issue and repairing the affected areas is crucial to prevent further deterioration.
Stains and Discoloration
Water stains on a ceiling are clear indicators of water damage. They typically appear as brown or yellowish marks on the textured surface of the ceiling. These stains indicate that water has penetrated the ceiling material, causing discoloration. Identifying and addressing the source of the water issue is crucial to prevent further damage and maintain the ceiling’s aesthetic integrity.
Peeling or Bubbling
When there is too much moisture, the popcorn texture on the ceiling can start to peel or form bubbles. This means that the textured material is separating from the surface of the ceiling. It is a visible sign that the moisture is affecting the adhesion of the popcorn texture. Identifying and addressing the source of the excess moisture is essential to prevent further peeling or bubbling and to maintain the integrity of the ceiling.
Soft or Spongy Texture
If water has damaged a popcorn ceiling, you may notice that the texture feels soft or spongy when touched. This change in texture is a straightforward indication that moisture has impacted the material. The usual firmness of the popcorn texture gives way to a softer feel, signaling potential water damage. Identifying and addressing the source of the moisture is crucial to prevent further harm to the ceiling.
Visible Mold or Mildew
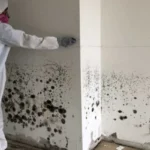
When a popcorn ceiling is consistently exposed to moisture, it can encourage mold or mildew growth. Observing dark spots or fuzzy patches on the popcorn ceiling is a clear sign of potential water damage. These visual cues indicate the presence of mold or mildew resulting from prolonged exposure to damp conditions. Identifying and promptly addressing the moisture source is crucial to prevent mold growth and mitigate the water damage issue.
Musty Odor
Water damages a ceiling and can produce a musty or damp smell. If you notice an unpleasant odor in the room, it might indicate hidden water damage in the ceiling. This smell often indicates moisture has penetrated the ceiling material, potentially leading to mold growth. Identifying and addressing the source of the odor is crucial to uncovering and resolving any underlying water damage issues in the ceiling.
Cracks or Sagging
When water damages a ceiling, it can weaken the structure, leading to cracks or even sagging in severe cases. These issues compromise the ceiling’s integrity. Cracks may appear, and in extreme situations, the ceiling might visibly dip or sag. Addressing the water damage promptly is essential to prevent further structural compromise and maintain the ceiling’s stability.
How to Repair Water-Damaged Popcorn Ceiling
Repairing a popcorn ceiling after water damage requires careful steps to ensure a smooth and lasting fix. The process involves identifying the source of the damage, preparing the area, and restoring the ceiling’s texture and appearance. Following a structured approach can prevent further issues and achieve a seamless repair. Below is a step-by-step guide to help you restore your ceiling effectively before you have to resort to popcorn ceiling removal.
Identify and Fix the Source of Water Damage
Before making any repairs, it is crucial to locate and fix the source of the water damage. Check for roof leaks, plumbing issues, or excessive humidity that may be causing moisture buildup. Simply patching the ceiling without addressing the underlying issue will lead to recurring damage.
Ensure Safety Precautions
Working on a water-damaged ceiling comes with risks, especially if electrical components are involved. Turn off the power in the affected area to avoid potential shocks or fire hazards. Wear protective gear, such as safety goggles and a dust mask, to prevent inhaling debris during the repair process.
Protect the Area
Cover the floor and furniture with plastic sheets or drop cloths to protect them from dust, debris, and paint splatter. Repairing a popcorn ceiling can be messy, so it is essential to prepare the area properly. Keeping the workspace organized will make the process smoother and more efficient.
Remove Damaged Popcorn Texture
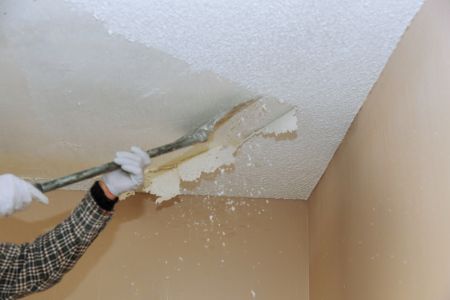
Use a putty knife or a popcorn ceiling scraper to remove the damaged texture carefully. Scrape gently to avoid damaging the drywall underneath. If the texture is difficult to remove, lightly mist the area with water to soften it. This step prepares the ceiling for a smooth and even repair.
Dry the Area
After removing the damaged popcorn texture, allow the ceiling to dry completely. Ensuring the surface is moisture-free helps prevent mold growth and allows new materials to adhere properly. Never skip this step, as moisture can compromise the repair.
Repair Any Ceiling Damage
If the ceiling has cracks, holes, or sagging areas, apply joint compound or drywall patches to restore its structure. Smooth out the material evenly and let it dry completely before moving on. Repairing these structural issues ensures a solid foundation for reapplying the popcorn texture.
Apply Primer
To prevent old water stains from bleeding through, apply a stain-blocking primer over the repaired area. Use a roller or brush to coat the surface evenly. This step seals the ceiling and provides a uniform base for the new popcorn texture, ensuring a clean and polished final look.
Reapply Popcorn Texture
Once the primer is dry, apply a new layer of popcorn texture using a spray-on product or a pre-mixed ceiling patch. Follow the manufacturer’s instructions for the best results. If spraying, keep the can at an even distance and apply in light, consistent strokes to match the existing texture.
Blend the Texture
Use a sponge or texture brush to feather the edges to ensure the repaired section blends seamlessly with the rest of the ceiling. This process softens the transition between the new and existing texture, creating a uniform finish. Take your time to avoid noticeable patches.
Paint the Ceiling
Once the new texture fully dries, paint the ceiling to match the existing color. Use a roller or brush to apply an even coat, blending the repaired section with the rest of the ceiling. A fresh coat of paint improves the appearance and adds a protective layer.
Clean Up
After completing the repairs, remove plastic coverings from the floor and furniture. Dispose of any debris properly and wipe down surfaces to eliminate dust. Taking the time to clean up ensures that your space returns to normal without any leftover mess from the repair process.
Final Thoughts
Restoring a popcorn ceiling that has suffered water damage requires a methodical process to guarantee both structural soundness and visual excellence. The process of fixing popcorn ceiling water damage begins with pinpointing and resolving the root cause of the water damage. It extends to the meticulous application of a new popcorn texture coupled with matching paint. Each step in this comprehensive approach is crucial for a successful repair so you can avoid popcorn ceiling removal and keep your ceiling looking its best.
A well-executed repair addresses visible damage and forestalls future issues, ensuring a resilient and aesthetically pleasing outcome. water restoration can help protect your home and keep your ceiling looking its best. Call today to speak with a pro today and get your popcorn ceiling damage repaired today!


