Discovering water damage in your laminate flooring can be frustrating and often leaves you unsure of what to do next. Whether caused by a spill, leak, or excess humidity, moisture can compromise the look and stability of your floors. Laminate flooring and water damage can really impact your home in unforeseen ways.
Knowing how to replace water damaged flooring and do basic repairs begins with understanding the signs, assessing the extent of the damage, and choosing the right approach. In this guide, we’ll walk you through the basics of replacing water-damaged flooring. Our team is here to help you make informed decisions.
Let’s take a closer look now at how you can easily fix buckled laminate flooring and how to clean up after water damage!
How to Spot Water Damage in Laminate Flooring
When inspecting laminate flooring for water damage, look for common signs, such as warping, buckling, or soft spots. It’s essential to determine whether water is the culprit or if something else is at play.
Common Signs: Warping, Buckling, or Soft Spots
Water damage in laminate flooring isn’t always apparent at first, but knowing what to look for can help you catch issues early. These common signs indicate moisture problems that may require prompt action to prevent further damage. Here’s what to watch for:
- Warping – Planks begin to bend or curve upward.
- Buckling – Flooring lifts and separates from the subfloor.
- Soft Spots – Areas that feel spongy or weak underfoot.
- Discoloration – Visible changes in color or texture.
- Peeling Edges – Corners or seams start to lift.
Laminate flooring and water damage can sneak up on you if you are not watchful. If you notice any of these symptoms, it’s time to explore how to repair laminate flooring water damage before it spreads.
Is It Water or Something Else? Diagnosing the Source
Determining whether your laminate flooring is damaged by water or something else can be tricky. Look for signs such as swelling, discoloration, or dampness near seams—these often indicate moisture issues. Use a moisture meter to confirm elevated levels.
Don’t overlook other sources, such as plumbing or appliance leaks. If the floor feels soft or spongy, mold could be the cause. Accurate diagnosis is crucial before determining the most effective way to repair laminate flooring water damage. Take time to investigate thoroughly.
Step-by-Step Guide: How to Repair Laminate Flooring Water Damage
Repairing water-damaged laminate flooring requires a careful, step-by-step approach. Below are the essential steps and stages to restore your flooring and prevent further damage.
Step 1: Remove Furniture and Inspect the Affected Area
Quick action is key when dealing with water damage. Begin by removing all furniture from the area to prevent the spread of moisture and to create a safe workspace. With the space clear, carefully inspect the flooring for divalent like warping, discoloration, or buckling.
These indicators often point to deeper damage below the surface. Prompt inspection helps you determine the severity of the problem and whether repairs or replacement may be needed later.
Step 2: Carefully Remove Damaged Planks
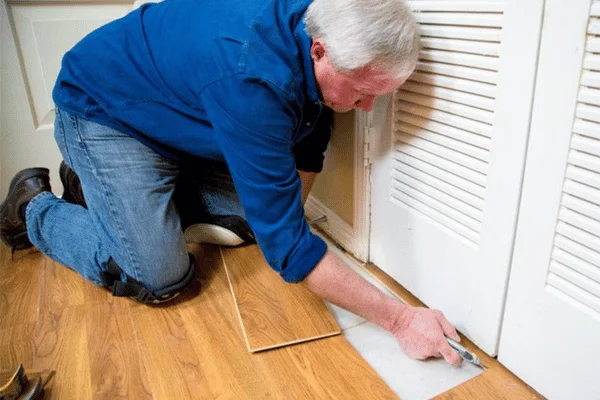
After identifying the damaged areas, carefully remove the affected planks. Use a pry bar or utility knife to lift the boards from the outer edge gently. Work slowly and methodically to avoid damaging nearby planks or underlayment.
Take note of how the planks were installed to simplify reinstallation later. This step is essential for gaining access to the subfloor and preparing for the next stage of the repair process.
Step 3: Dry the Subfloor Thoroughly
With the planks removed, the next step is to dry the subfloor thoroughly. Use a wet/dry vacuum to remove standing water, and then set up fans or dehumidifiers to accelerate the drying process.
Good ventilation is crucial during this stage to prevent the growth of mold or mildew. Inspect the subfloor for any signs of damage, such as swelling or stains. Be patient—drying thoroughly can take time, but it’s critical for a successful and lasting repair.
Step 4: Install New Matching Laminate Planks
Once the subfloor is dry and damage-free, install new matching laminate planks. Begin at the corner of the room, clicking each plank into place and ensuring a snug fit. Use spacers along the wall to maintain expansion gaps.
Cut planks as needed to fit around features like vents or trim. Stagger the joints for a natural appearance and secure each row carefully. This step completes the physical restoration of your floor.
Step 5: Seal the Area and Prevent Future Moisture Intrusion
After installation, seal the area to protect against future water exposure. Apply a moisture-resistant sealant along the edges and seams to prevent water from seeping in. Check nearby plumbing and windows for potential leaks and make necessary repairs. In humid rooms, use a dehumidifier and ensure good airflow.
Preventive care is just as critical as repair. By following these steps, you’ll understand not only how to repair but also how to replace water damaged flooring if needed.
Should You Repair or Replace the Entire Floor?
Deciding whether to repair or replace the entire laminate floor depends on several factors, including the extent of the damage, the condition of the subfloor, cost considerations, and how well the new planks match the existing ones.
Factors to Consider: Size of the Damage, Matching Planks, Subfloor Condition
Deciding whether to repair or replace your laminate flooring requires careful evaluation of a few crucial elements. These factors help ensure you choose the best approach for both appearance and durability.
- Size of the Damage: The extent of damage is vital. If only a few planks are affected, targeted repairs can be effective and economical. However, when damage is widespread, a complete replacement may be more practical for restoring a uniform look and function.
- Matching Planks: Finding replacement planks that match your current floor is essential for a seamless repair. If the original design has been discontinued, repairs may be noticeable and affect the floor’s overall aesthetic.
- Subfloor Condition: A stable subfloor is critical. If it’s warped or damaged, fixing it before any repair or replacement is necessary to prevent future flooding issues.
Cost Comparison and Long-Term Durability
Understanding how to repair laminate flooring water damage can help you decide whether to fix or replace your floors. Evaluating cost, durability, and long-term benefits is key to making the right choice for your home when faced with laminate flooring and water damage.
| Aspect | Repair | Replacement |
| Cost | Generally lower upfront cost, especially if matching planks are available. | A higher initial expense due to the complete purchase and installation of flooring. |
| Durability | It may have limited longevity; repaired spots can be vulnerable, especially if water damage is present. | It provides a fresh, uniform surface with improved durability and longevity. |
| Home Value Impact | Minimal effect on overall home value. | It can significantly boost home value and aesthetics. |
| Practicality | Best for minor, localized damage. | Recommended for extensive or widespread damage. |
While repairing can save money upfront, repeated fixes might be needed. Replacing damaged laminate flooring often offers better durability and adds value, especially when water damage is widespread.
How to Prevent Laminate Flooring Water Damage
To keep your laminate flooring safe from water damage, it is essential to follow certain practices, especially in areas prone to moisture, such as kitchens, bathrooms, and basements. Let’s explore how to implement these strategies effectively.
Best Practices for Kitchens, Bathrooms, and Basements
Preventing laminate flooring from water damage is crucial in moisture-prone areas, such as kitchens, bathrooms, and basements. Follow these key tips to protect your floors and extend their lifespan:
- Clean Spills Immediately: Wipe up water and spills quickly to prevent seepage into the laminate.
- Use Mats or Rugs: Place moisture-absorbing mats near sinks, dishwashers, and entryways to catch drips.
- Maintain Appliances: Regularly check and repair leaks in dishwashers, refrigerators, and plumbing fixtures.
- Control Humidity: Use a dehumidifier in basements to maintain low moisture levels and prevent warping.
- Ventilate Bathrooms: Run exhaust fans during and after showers to reduce moisture buildup.
- Regular Inspections: Conduct frequent checks for leaks and damage and address them promptly to prevent costly repairs.
Implementing these practices will keep your laminate flooring safe, dry, and looking its best for years to come.
Underlayment and Moisture Barriers That Work
To fix buckled laminate floors caused by moisture, it’s crucial to start with the proper underlayment and moisture barriers. Use a high-quality underlayment with a built-in vapor barrier to prevent moisture from rising through the subfloor. This protects your laminate and provides cushioning and sound absorption.
In areas prone to humidity or basements, adding a separate moisture barrier, such as a polyethylene sheet, offers extra protection. These steps help reduce the risk of water damage, keeping your laminate floor stable and looking great for years. Professional Water Damage Restoration and moisture control is crucial in preventing and correcting buckled flooring.
How to Repair Laminate Flooring Water Damage- Final Thoughts
Tackling water damage in laminate flooring can seem intimidating, but with the proper steps, you can restore your floor’s beauty and functionality. By identifying the damage early and following the repair process, you can save both time and money.
Remember to take preventive measures to keep your flooring safe from future moisture issues. With a little effort, you’ll enjoy a durable and attractive floor for years to come. Laminate flooring water damage doesn’t have to ruin your space. Let’s fix it—quickly and affordably.
Call us today to get started with your laminate flooring restoration and water damage repairs!


