Water-damaged leather can seem like a lost cause, but with the right approach, restoration is possible. This guide walks you through how to repair leather at home using safe, effective techniques. From drying tips to conditioning advice, you’ll learn how to revive your leather’s look and feel—without making the damage worse.
Water stains on leather can be tricky, but knowing how to repair leather properly makes all the difference. To remove water stains from leather, gently blot excess moisture, then condition the material to restore softness. When saving leather damaged by water, avoid heat sources and use a quality leather conditioner to prevent cracks and discoloration.
Here’s what you need to know, so let’s get started.
Why Water Damages Leather and How to Identify It
Water can seriously harm leather by causing stains, stiffness, and even mold growth. You’ll want to watch for signs of water damage, like discoloration or a rough texture, especially in types of leather that are more prone to these issues.
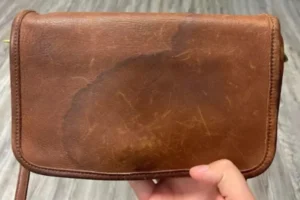
Signs of Water Damage on Leather Items
Water-damaged leather shows several telltale signs. Spotting them early helps prevent long-term deterioration.
- Dark patches or rings – Common water stains that indicate moisture absorption.
- Stiff or brittle texture – Leather loses flexibility when water disrupts its fibers.
- Discoloration – Uneven tones or faded areas suggest water exposure.
- Dull finish – A lack of sheen may mean the leather’s protective oils are compromised.
- Surface cracking – Severe damage can lead to visible cracks.
To restore leather, gently clean and condition it to maintain its appearance. Removing water stains promptly helps preserve the original look and extend the lifespan of the item.
Types of Leather Most Susceptible to Water Damage
Not all leather reacts the same to moisture. Some types are especially vulnerable.
- Suede – Highly porous and absorbs water quickly, causing stains.
- Nubuck – Similar to suede, with a soft texture easily damaged by moisture.
- Aniline leather – Unfinished and lacks protective coatings, making it prone to spotting.
- Unfinished leather – Absorbs water readily and shows damage fast.
- Full-grain/top-grain leather – More resistant but still susceptible to dullness or spotting.
Use water-repellent sprays and dry items properly to protect leather. Prevention is key to maintaining quality and appearance.
How to Restore Water-Damaged Leather at Home
Discover simple and effective steps to revive leather damaged by water. With the right tools and techniques, you can restore its look and feel without professional help.
Step 1: Drying Water-Damaged Leather
Blot excess moisture with a soft cloth—never rub. Air-dry in a well-ventilated space, away from direct heat or sunlight. Stuff with newspaper to retain shape. Drying may take hours or days, depending on the thickness. Be patient; rushing can cause cracking or permanent damage to the leather’s structure.
Step 2: Cleaning Leather to Remove Water Stains
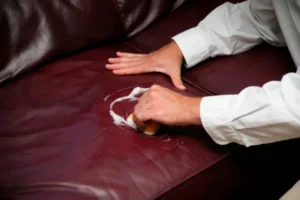
To treat water stains on leather, gently wipe with a dry cloth. If stains persist, blot with a mixture of vinegar and water, then rinse with plain water. Avoid rubbing. Let the leather air dry fully. This method lifts moisture marks while preserving the material’s integrity for the next conditioning step.
Step 3: Conditioning Leather to Rehydrate
Apply leather conditioner using a soft cloth in circular motions. Focus on dry or cracked areas. Let it absorb for 15–30 minutes, then buff with a clean cloth. Conditioning restores moisture, improves texture, and prevents future damage, keeping your leather item supple and looking its best.
Step 4: Restoring the Leather’s Original Texture
Clean with a damp cloth, then use a leather brush to revive the grain. Apply the restoration cream or conditioner evenly, let it absorb, and then buff to enhance the shine. Finish with a protective leather sealant if needed. Regular care helps maintain texture, softness, and long-term durability.
Common Mistakes to Avoid When Restoring Leather
Avoid costly errors that can worsen leather damage. This guide highlights common missteps and offers smarter alternatives to ensure safe and successful restoration every time.
Using Heat to Dry Leather
Drying leather with heat may seem convenient, but it can lead to cracking and warping. Avoid hairdryers or heaters. Instead, air dry at room temperature on a clean surface, away from sunlight. Use a fan to speed up the drying process gently. Check progress regularly—rushing the process can compromise the leather’s texture and long-term durability.
Using Harsh Cleaning Products
Harsh cleaners can strip leather’s natural finish, causing discoloration or cracking. Always use gentle, leather-specific products and test on a hidden area first. Leather is a delicate material that requires proper care. Avoiding strong chemicals helps preserve the texture, color, and longevity of your item, ensuring it stays beautiful and functional for years to come.
Skipping Leather Conditioning After Cleaning
One common mistake when restoring water-damaged leather is skipping the conditioning step. Cleaning removes natural oils, leaving leather dry and vulnerable. Apply a quality conditioner evenly and let it absorb. Conditioning restores moisture, prevents cracking, and protects against future damage. It’s a vital step to keep your leather soft, strong, and long-lasting.
When to Seek Professional Help for Water-Damaged Leather
Not all leather damage can be fixed at home. Discover the warning signs that indicate it’s time to consult a specialist for proper restoration.
Signs That Restoration Might Be Beyond DIY Repair
Water damage can compromise leather beyond the scope of DIY methods. Here are key signs it’s time to call an expert:
- Persistent Discoloration: If stains remain after cleaning, deeper restoration may be needed.
- Cracking or Brittleness: Leather that feels stiff or flakes easily likely needs professional care.
- Mold or Mildew: These require specialized treatment to prevent further deterioration.
- Structural Damage: Warped shapes or sagging indicate internal breakdown.
- Failed DIY Attempts: If your efforts worsen the condition or yield poor results, stop and seek help.
Understanding how to repair leather includes knowing when not to do it yourself. Protect your item by recognizing these red flags early.
Choosing a Qualified Leather Repair Specialist
Selecting the right professional ensures your leather gets the care it deserves. Consider these tips:
- Check Credentials: Look for specialists with strong reviews and proven experience.
- Ask About Water Damage: Ensure they’ve handled similar cases successfully.
- Review Their Portfolio: Before-and-after photos reveal their skill level.
- Understand Their Process: Ask about techniques, products, and expected outcomes.
- Get a Clear Quote: A trustworthy expert provides transparent pricing and timelines.
- Gauge Communication: Choose someone who listens and explains clearly.
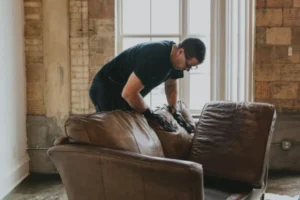
A skilled specialist can restore your leather’s look, feel, and structure, especially when water damage runs deep.
Choosing the Right Leather Repair Specialist
Selecting the right professional ensures your leather gets the care it deserves. Consider these tips:
- Check Credentials: Look for specialists with strong reviews and proven experience.
- Ask About Water Damage: Ensure they’ve handled similar cases successfully.
- Review Their Portfolio: Before-and-after photos reveal their skill level.
- Understand Their Process: Ask about techniques, products, and expected outcomes.
- Get a Clear Quote: A trustworthy expert provides transparent pricing and timelines.
- Gauge Communication: Choose someone who listens and explains clearly.
A skilled specialist can restore your leather’s look, feel, and structure—especially when water damage runs deep.
How to Prevent Future Water Damage on Leather Items
To keep your leather items safe from water damage, it is essential to take proactive steps. Using a water-repellent leather spray, storing your items properly, and maintaining them regularly are essential strategies for keeping your leather goods in good condition. By implementing these practices, you can protect your leather and extend its lifespan.
Using Water-Repellent Leather Spray
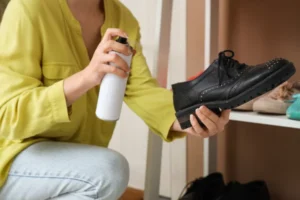
Apply water-repellent spray to clean, dry leather from a distance of 6–8 inches. Coat evenly and let it dry thoroughly. Reapply every few months or after washing. This protective barrier helps prevent moisture damage and makes it easier to remove water stains from leather before they become permanent.
Proper Storage for Leather Items
Store leather in breathable dust bags or cotton sheets, never plastic. Store items in a cool, dry place away from sunlight. To retain their shape, stuff bags and shoes with acid-free paper. Avoid stacking heavy objects. Periodically check for moisture or mold to ensure long-term preservation and durability.
Regular Leather Care and Maintenance
Clean leather gently with a damp cloth, then apply conditioner to restore oils and repel moisture. Inspect regularly for wear or damage. Use waterproofing spray as needed. Avoid sunlight and humidity during storage. These habits help prevent cracking and extend the life of your leather items.
Final Thoughts- Saving Leather Damaged By Water
Restoring water-damaged leather isn’t just about fixing the immediate issue; it’s also about taking steps to prevent future damage.
By following proper techniques and regularly maintaining your leather items, you can keep them looking great for years. Avoid common mistakes and seek professional help if the damage is too severe. With care and attention, your leather will stay in top shape and retain its beauty.
Need Help Fixing Water Damage? Get Your Free Consultation Now!